Progressive Web Apps
For this project, we were tasked with creating a Progressive Web App (PWA for short). PWAs are just like regular websites, except that they also funtion similar to an application, such as those made for Android or iOS. Throughout this page, you'll see the various techniques put into place that help make up an effective PWA.
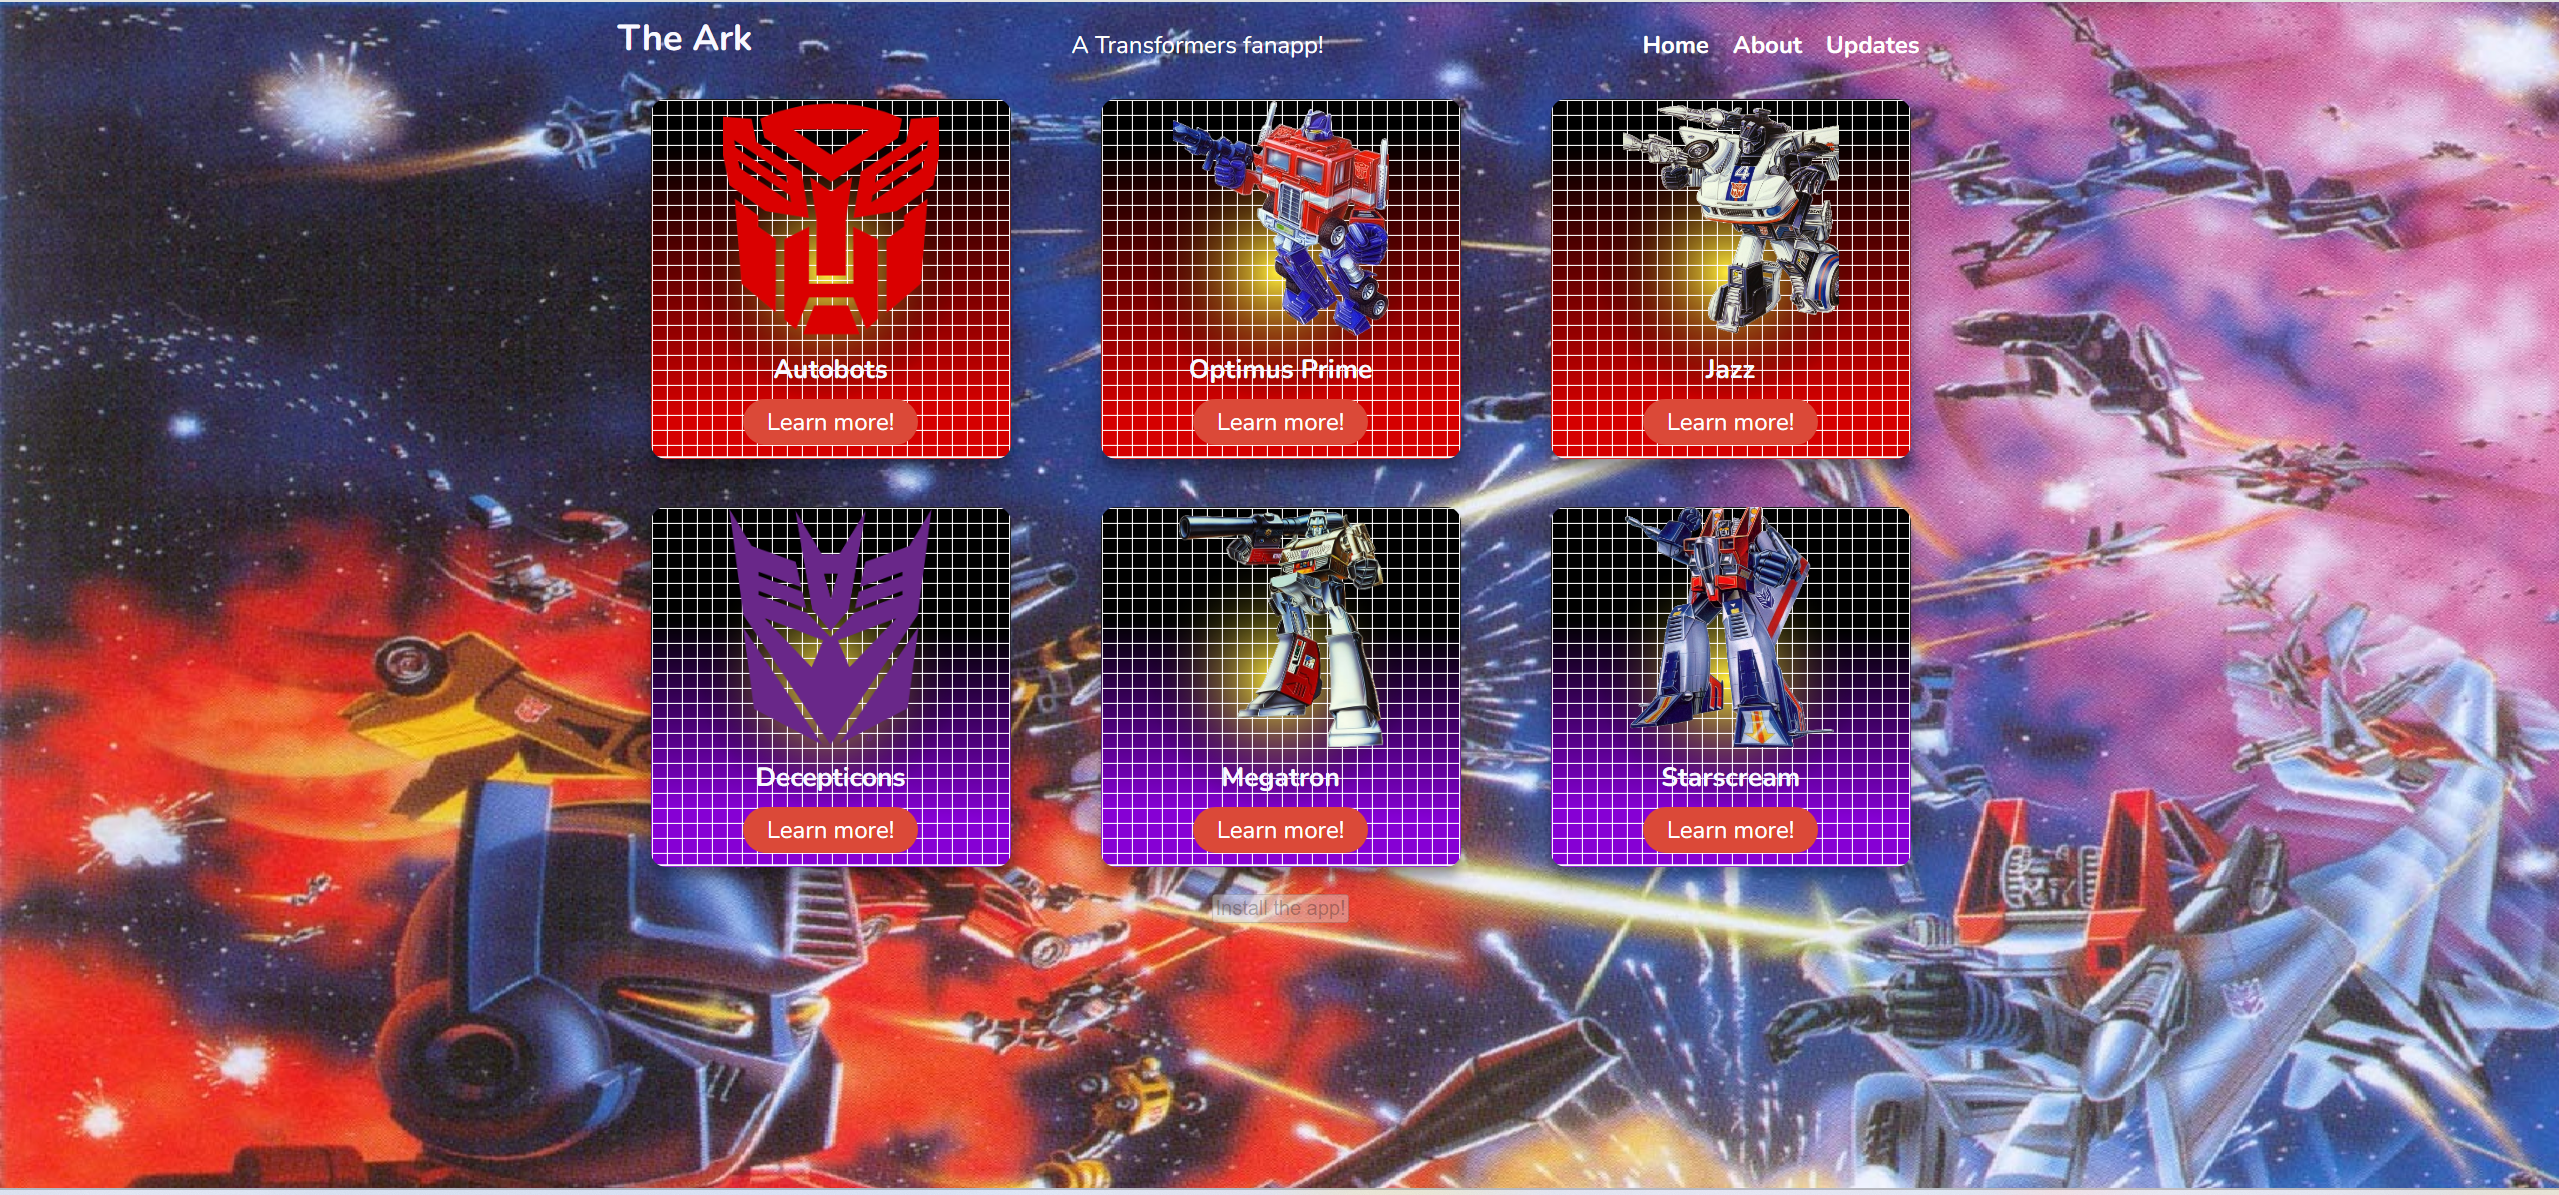
To see my take on a PWA, click here!
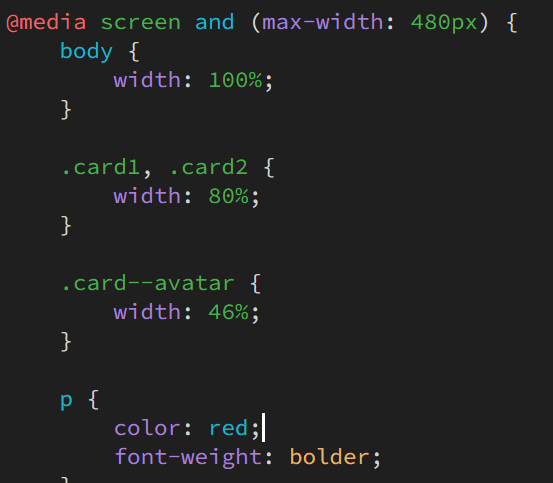
Even with PWAs, responsive design remains a crucial component. For mine, I created one media query at 480px and another at a minimum of 481px and a maximum of 923px. Both of these resize the image widths for mobile and tablet displays. Without them, the images displayed on the PWA would be cropped off, resulting in an unappealing presentation. Through various trial and error, I determined these two spots were the points in which the screen crunched down the size of the image containers (also referred to as cards), resulting in an off-putting appearance if action wasn't taken to fix them.

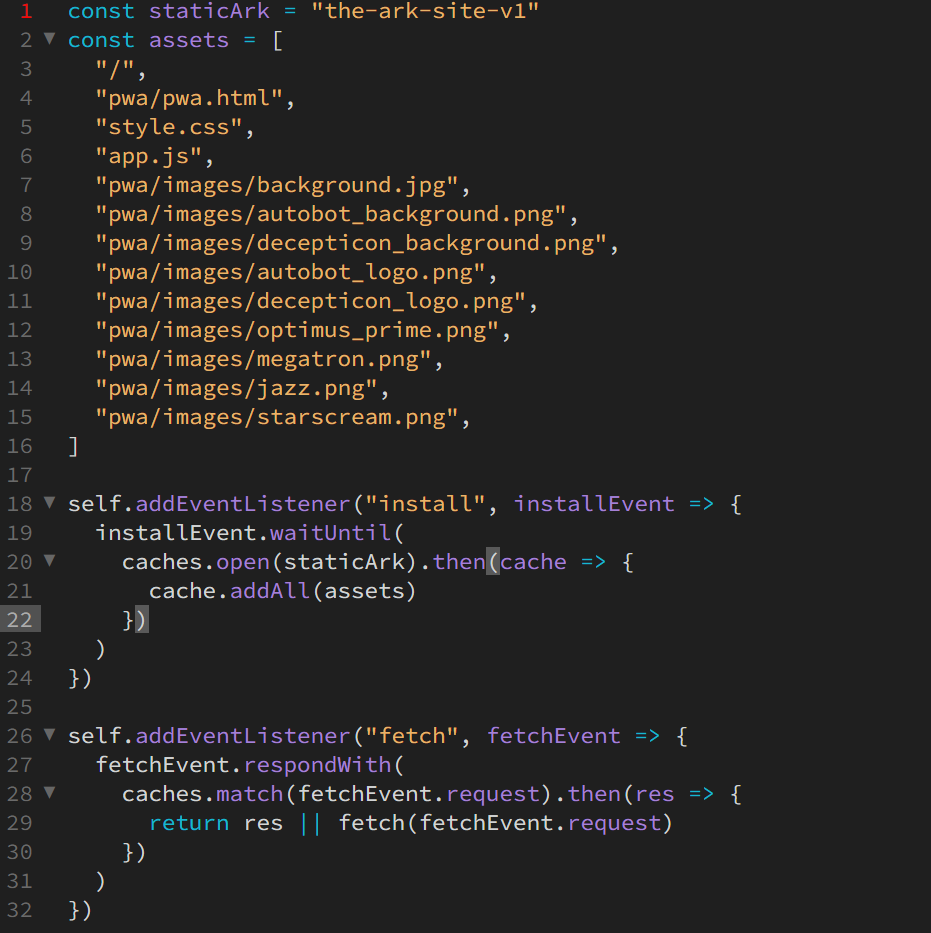
Another component of PWAs is called a service worker. Service workers are a JavaScript file that effectively catalogs all of the PWAs files and saves them to the device's cache. This speeds up the load time of the app as well as allow for offline capabilities. Once the script caches the data, it can then load the app's data right to the device (utilizing a fetch event) rather than loading the assets from a web server every time. As demonstrated below, my PWA's service worker contains the site's assets, an install event to save the data to the cache, and a fetch event to load the data from the cache each time the app is loaded from now on.
Naturally, a key feature of apps is the ability to install them. In order to install PWAs, one needs two items: a web app manifest, and a before install JavaScript prompt.
Web App Manifests
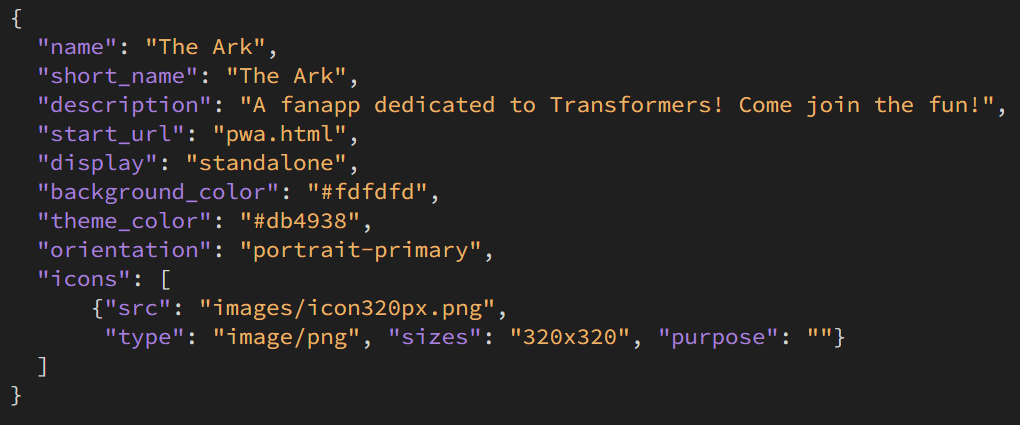
The manifest is a JSON file that catalogs data on your app. This includes the name of the app, a short form name for the app when displayed, the app's icon, a description of the app, the start page to load each time the app is accessed, and colors for the install prompt window.
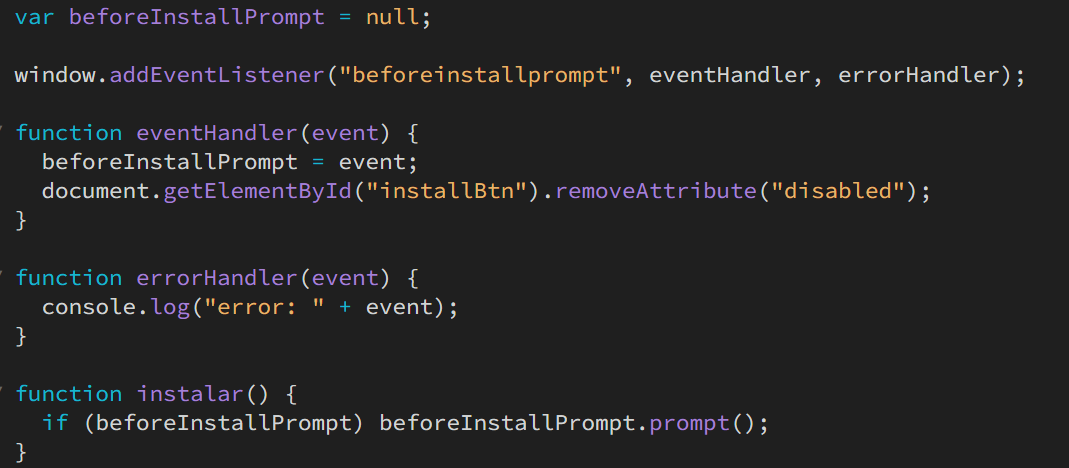
Before Install Prompt
This piece of JavaScript code will work in tandem with the manifest to help build the installation window. By adding an eventHandler function and an addEventListener codepiece to the script, the install prompt utilizing the information in the manifest will pop up the first time the page is loaded. If this prompt is dismissed, an install button will become available should the user wish to install the app at a later time.
Search Engine Optimization (SEO)
As with other pages on this site, both this documentation page and the main PWA offer title and meta description and keyword tags. All images have alt text added as well for acessibility. Headings on this documentation page are done with hierarchy order in mind in order to make the content's importance more pronounced.
Testing Devices
I utilized Chrome's development tools to check whether my PWA met the requirements. I then used my Google Pixel 4a's mobile browser to test the installation functions.
Sources
- Basques, Kayce, and Sofia Emelianova. “Debug Progressive Web Apps | DevTools.” Chrome for Developers, 25 July 2016, developer.chrome.com/docs/devtools/progressive-web-apps. Accessed 7 Oct. 2024.
- “Developer Tips - Display a Prompt to Install Your PWA | Modyo English.” Modyo English, www.modyo.com/community/developer-tips/display-a-prompt-to-install-pwas. Accessed 7 Oct. 2024.
- Ndaw, Ibrahima. “How to Build a PWA from Scratch with HTML, CSS, and JavaScript.” FreeCodeCamp.org, 3 Feb. 2020, www.freecodecamp.org/news/build-a-pwa-from-scratch-with-html-css-and-javascript/.
Reflection Statement
Overall, this was an interesting project to take part of. I mainly struggled with trying to find the right media query px size so that my images weren't cut off when viewed on smaller screens.
I additionally had some trouble initially with the .container class, I wanted two separate background images (one for the Autobots and one for the Decepticons). I solved this through spliting the container class into two different classes and creating an additional function in the app.js file so that it'd write code for two different card containers.
Also, it was difficult trying to find the right colors for the navigation bar, as most colors I used tended to blend right in with the background. Using a bit of trial and error and adding font weights, I managed to (nearly) overcome this obstacle.
I ultimately utilized my peer's feedback to change the text colors of the navigation bar. One of my peers made the suggestion that the navigation colors I had chosen may not be as accessible as I had previously thought. As such, I changed them from red to white to be better accessible to screen readers and color blind individuals.